
Custom Domains
By default, your project's microsite is hosted on a VOTLI subdomain (e.g. myproject.votli.app). If you'd prefer to use your own domain, you can configure a custom domain.
You can use either a subdomain (e.g. legal.myapp.com) or a root domain (e.g. myapp.com). The setup process is different for each - follow the section that applies to you.
Option A - Using a subdomain
A subdomain like legal.myapp.com or pages.myapp.com is the simplest option. It works with any domain registrar or DNS provider.
Step 1 - Add the domain in VOTLI
- Go to your project's Settings
- Under Custom Domain, enter your subdomain (e.g.
legal.myapp.com) - Click Add domain
Step 2 - Add a CNAME record
Log in to your DNS provider (Cloudflare, Namecheap, GoDaddy, Route 53, etc.) and add a CNAME record:
| Type | Name | Target |
|---|---|---|
| CNAME | legal |
myproject.votli.app |
The Name field is just the subdomain part (e.g.
legal), not the full domain. Your DNS provider will append the root domain automatically.
Step 3 - Verify
Once the DNS record propagates (usually a few minutes, up to 48 hours), go back to the VOTLI dashboard and click Verify. VOTLI will confirm the domain is pointing correctly.
No need to keep checking - VOTLI verifies DNS in the background automatically and will send you an email once your domain is confirmed.
Option B - Using a root domain
A root domain like myapp.com (without any prefix) requires your DNS to be managed through Cloudflare. This is because most DNS providers don't support CNAME records on root domains - but Cloudflare does, using a feature called CNAME Flattening.
Step 1 - Move your DNS to Cloudflare
If your domain isn't already on Cloudflare, you'll need to transfer DNS management:
- Create a free Cloudflare account if you don't have one
- Add your domain to Cloudflare - it will scan your existing DNS records
- Cloudflare will give you two nameservers (e.g.
anna.ns.cloudflare.com,bob.ns.cloudflare.com) - Go to your domain registrar (where you purchased the domain) and replace the existing nameservers with the Cloudflare nameservers
- Wait for the nameserver change to propagate (this can take a few minutes to 24 hours)
- Cloudflare will show your domain as Active once the transfer is complete
Important: Moving nameservers to Cloudflare does not transfer your domain - you still own it at your registrar. Cloudflare only manages the DNS records.
Step 2 - Add the domain in VOTLI
- Go to your project's Settings
- Under Custom Domain, enter your root domain (e.g.
myapp.com) - Click Add domain
Step 3 - Add a CNAME record in Cloudflare
In Cloudflare's DNS settings for your domain, add a CNAME record:
| Type | Name | Target | Proxy status |
|---|---|---|---|
| CNAME | @ |
votli.app |
Proxied (orange cloud) |
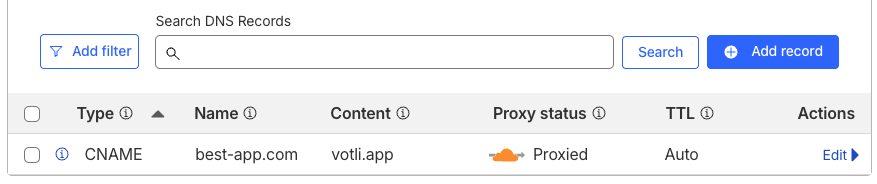
Use
@as the name - this tells Cloudflare to apply it to the root domain. Cloudflare will automatically flatten the CNAME into an A record behind the scenes.
Set the proxy status to DNS only (grey cloud icon, not orange). VOTLI handles SSL and routing directly.
Step 4 - Verify
Go back to the VOTLI dashboard and click Verify. VOTLI will confirm the domain is pointing correctly.
No need to keep checking - VOTLI verifies DNS in the background automatically and will send you an email once your domain is confirmed.
SSL / HTTPS
VOTLI automatically provisions an SSL certificate for your custom domain via Let's Encrypt. Your pages will be served over HTTPS - no extra configuration needed.
Notes
- You can only have one custom domain per project
- Your VOTLI subdomain (e.g.
myproject.votli.app) continues to work even after adding a custom domain - If you remove the custom domain, traffic reverts to your VOTLI subdomain
- For root domains, make sure the Cloudflare proxy is set to DNS only (grey cloud)
- Custom domains apply to your microsite only, not to emails. Emails sent by VOTLI (support replies, confirmations, etc.) will always come from
[email protected]